
I. Purpose & Scope
To safely and effectively provide instruction on the inspection and proper use of Voltage Detector and Phasing Testers.
II. Definitions
Standard PPE – High Viz Garment, Hard Hat, Z-87.1 Safety Glasses, Gloves, Pants, Work Boots
III. Process
NOTE: Work instruction does not supplement the manual. For specific instructions for the exact model please refer to the owner’s manual.
A. Potential Hazards
- Electric Shock Hazard
B. PPE
- Standard PPE
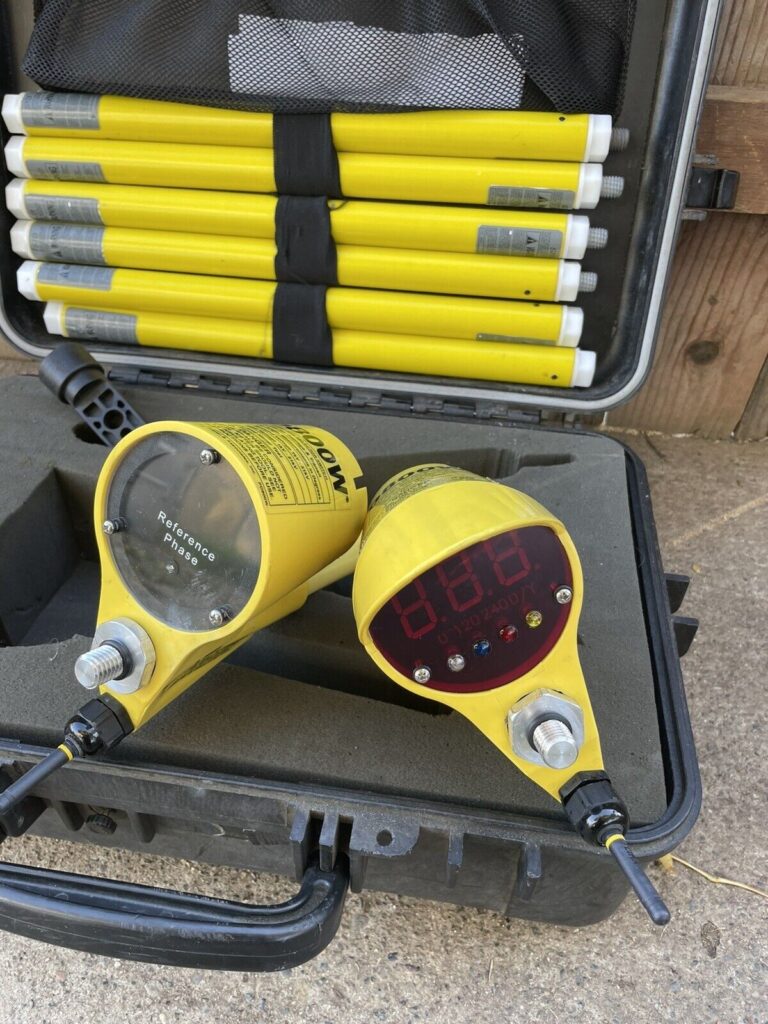
C. Inspection
- Inspect to ensure unit is free from any contaminants such as dirt, grease, etc. and that there are no apparent physical damages.
D. Use
Sensing on Capacitive Test Points
- Turn the selector switch to position C (capacitive sensing).
- Fasten the meter probe to appropriate live line tool.
- Turn on the test device.
- To test the meter probe on the test device depress the button on the test device with the meter probe end. The meter should show a half scale deflection minimum.
- Test the meter probe on the capacitive point.
- No meter deflection indicates de-energized source.
- Any meter deflection indicates voltage present.
- Retest meter on test device to confirm that it is working.
Phasing on Capacitive Test Points
- Turn the selector switch to position CP (capacitive phasing).
- Connect the meter probe to the second probe with the interconnect cable.
- Turn on the test device.
- To test the meter probe on the test device provided, depress the button of the test device with the meter probe and place the second probe end on the other terminal. The meter should show a reading of at least 2.5kV. If not, check all batteries or send for repair.
- While depressing the button with the meter probe, have a second probe make contact with the meter probe end. The meter probe should show a near or zero reading.
- Place the meter probe end to a capacitive test point.
- Have the second probe make contact with the meter probe end on the capacitive test point. The test point meter probe should show a zero reading.
- Leave the meter probe on the capacitive test point to the first elbow and contact the second probe on another capacitive test point.
- In Phase is represented by no meter reading or deflection.
- Out of Phase is represented by a meter reading or deflection.
Sensing on Direct Line
- Turn the selector switch to position L.
- Fasten the meter to appropriate live line tool.
- Turn on the test device.
- To test the meter probe on the test device provided, depress the button on the test device with the meter probe end. The meter should show at least a 3kV deflection. If not , check all batteries or send for repair.
- Make the test on the electrical circuit conductor, then retest unit on the test device.
- Meter deflection indicates voltage present.
- No deflection means line is de-energized.
Phasing on Direct Lines
- Turn the selector switch to position LP (Line Phasing).
- Connect the meter to the second probe with series lead.
- Turn on the test device.
- To test the meter probe on the test device provided, depress the button of the test device with the meter probe, and place the second probe end on the other terminal. The meter should show a reading of at least 2.5kV. If not, check all batteries or send for repair.
- While depressing the button with the meter probe, have the second probe make contact with the meter probe end. The meter should show a zero reading.
- Place the meter probe end on one of the conductors.
- Have the second probe make contact with the meter probe end on the same conductor. The probe meter should show a zero reading.
- Leave the meter probe on the first conductor and contact the second probe on another conductor. If the conductors are in phase, the meter should show a zero reading.
- In phase is represented by no meter reading or deflection.
- Out of phase is represented by a meter reading or deflection.
Line-To-Line and Line-To-Ground Voltage
- Turn the selector switch to position LP (Line Phasing).
- Connect the meter to the second probe with the interconnect cable.
- Turn on test device.
- To test the meter probe on the test device provided, depress the button of the test device with the meter probe end, and place the second probe end on the other terminal. The meter should show a reading of at least 2.5kV. If not, check all batteries or send for repair.
- To measure line-to-line voltage, use the meter probe, series lead, and second probe combination to make contact between lines and take a reading. To measure voltage line-to-ground, use the meter probe, interconnect cable and second probe combination to make contact between the line and ground and take a reading.
Voltage Check or Indication URD
- Set the select switch to L.
- Attach insulating handle to meter probe.
- Turn on the test device.
- To test the meter probe on the test device provided, depress the button on the test device with the meter probe end. The meter should show at least a 3kV deflection. If not, check all batteries or send for repair.
- Attach URD bushing adapter to meter probe. Plug meter probe with URD bushing adapter into desired bushing.
- If line voltage is present, meter will indicate approximate line to ground voltage.
- If line voltage is not present, there will be no meter reading or deflection.
Phase-to-Ground Voltage Check, URD
- Set select switch to LP (Line Phasing).
- Connect the meter to the second probe with the interconnect cable and attach insulating handles to both probes.
- Turn on the test device.
- To test the meter probe on the test device provided, depress the button of the test device with the meter probe, and place the second probe end on the other terminal. The meter should show a reading of at least 2.5kV. If not, check all batteries or send for repair.
- While depressing the button with the meter probe, have the second probe make contact with the meter probe end. The meter should show a zero reading.
- Attach URD bushing adapter to meter probe.
- Plug meter probe with URD busing adapter into desired bushing. Touch second probe to good electrical ground connection.
- If line voltage is present, meter will indicate nominal phase to ground voltage.
- If no line voltage is present, there will be no meter reading or deflection.
Phase-to-Phase Voltage Check, URD
- Set selector switch to LP (Line Phasing).
- Connect the meter to the second probe with the interconnect cable and attach insulating handles to both probes.
- Turn on the test device.
- To test the meter probe on the test device provided, depress the button of the test device with the meter probe, and place the second probe end on the other terminal. The meter should show a reading of 2.5kV. If not, check all batteries or send for repair.
- While depressing the button with the meter probe, have the second probe make contact with the meter probe end. The meter should show a zero reading.
- Attach both URD bushing adapters to probes. Plug meter probe with URD bushing adapter and second probe with URD bushing adapter into bushing to be tested.
- If both phases are present, meter will indicate nominal phase-to-phase voltage.
- If neither phase is present, there will be no meter reading or deflection.
URD Phasing
- Set selector switch to LP (Line Phasing).
- Connect the meter to the second probe with the interconnect cable and attach insulating handles to both probes.
- Turn on the test device.
- To test the meter probe on the test device provided, depress the button of the test device with the meter probe, and place the second probe end on the other terminal. The meter should show a reading of 2.5kV. If not, check all batteries or send for repair.
- While depressing the button with the meter probe, have the second probe make contact with the meter probe end. The meter should show a zero reading.
- Attach both URD bushing adapters to probes. Test for phase-to-ground voltage on bushings to be phased. Nominal phase-to-ground voltage should be present on both bushings before phasing.
- Plug meter probe with URD bushing adapter and second probe with URD bushing adapter into bushings to be phased.
- In phase is represented by near zero meter reading or deflection.
- Out of phase is represented by a meter reading or deflection.
E. Maintenance
- High voltage probe assemblies shall be wiped clean prior to each use with a silicone impregnated cloth and kept clean and free of contaminants.
- Always confirm internal battery voltage before and after each use.
- Turn the selector switch on the back of the meter to position BT (Battery Test) and hold to the right. The meter should show a full scale deflection. If there is less than full battery deflection, the meter probe battery should be changed.
- If the battery test fails replace the 9 volt battery located behind the attachment point for the hot stick located on the main meter face.