
I. Purpose & Scope
To safely and effectively provide instruction on the inspection and proper use of dump trucks.
II. Definitions
Standard PPE – High Viz Garment, Hard Hat, Z-87.1 Safety Glasses, Gloves, Pants, Work Boots
III. Process
NOTE: Work instruction does not supplement the manual. For specific instructions for the exact model please refer to the owner’s manual.
A. Potential Hazards
- Moving Parts Hazard
- Fire and Explosion Hazard
- Electric Shock Hazard
- Crush Hazard
- Slip and Fall Hazard
- Tip Over Hazard
- Dust Hazard
- Toxic fumes hazard
B. PPE
- Standard PPE
- Respiratory Protection (recommended)
- Safety Goggles or Face Shield (recommended)
- Hearing Protection
C. Inspection
- Check the overall appearance and condition of the windows, mirrors, and lights.
- Check the air intake opening to ensure it is clear of obstructions.
- Check beneath the vehicle for signs of leaks from fuel, oil or water.
- Check for damaged, loose or missing marks.
- Check for parts showing signs of excessive wear or lack of lubrication.
- Check load for proper securement.
- Check engine oil, coolant, power steering fluid, windshield washer fluid and engine belt.
- Check hood latch.
- Check steps and grab handles for cleanliness or wear.
- Adjust seat for easy reach of controls and visibility.
- Check seat belts for wear or damage.
D. Use
Cab Access
- Always face the vehicle when accessing or leaving the cab or frame access area.
- Use three points of contact (two feet one hand or one foot two hands) to grip the steps or handholds whenever possible and look where you are going.
- Use even more care when steps and handholds (or footwear) are wet, coated with ice, snow, mud, oil, fuel, or grease.
NOTE: Do not step on vehicle components without anti-skid surfaces or use components not designed for entry-and-exit use. You could fall and injure or kill yourself if you step onto a slippery surface. - Do not step onto the surface of a fuel tank. A fuel tank is not a step. The tank surface can get very slippery, and you might not be able to prevent a fall. Use only the steps and handholds provided, and not the chain hooks, quarter fenders or other components not designed for that purpose.
- Do not climb onto and off the deck plate; use the steps and grab handle provided. If there is no deck plate, or if proper steps and grab s are not provided, do not climb into the area behind the cab.
- Keep the steps clean. Clean any fuel, oil, or grease off the steps before entering the cab.
Lock and Unlock Cab Doors
- To lock or unlock the doors from out side the cab:
- Rotate the key toward the rear of the vehicle to lock (clockwise), or
- Rotate the key toward the front of the vehicle (counter clockwise) to unlock.
Deckplate Access
- Always reinstall steps before entering the cab or accessing the deck plate. Without steps you could slip and fall. Failure to comply may result in personal injury or death.
- Keep steps clean. Clean any fuel, oil, or grease off the steps before entering the cab or accessing the deck plate. Stepping on a slippery surface can cause a fall which may result in death or personal injury.
- When you are climbing onto and off the deck plate, maintain at least three points of contact with your hands on the grab handles and your feet on the steps. Always face toward the vehicle when entering or exiting the cab and look where you are going. Failure to comply may result in death or personal injury.
- When stepping onto a surface to enter the cab or access the deck plate, only use the steps and grab handles installed and designed for that purpose. Failure to use the proper steps and grab handles could cause a fall which may result in death or personal injury.
- Any alteration (adding bulkheads, headache racks, tool boxes, etc.) behind the cab that affects the utilization of installed grab handles, deck plates, or frame access steps should comply with Federal Motor Carrier Safety Regulation 399.
Opening the Hood
- The hood is secured in its closed position by external latches, called Hold-downs, located on both sides of the hood. These Hold-downs keep the hood from opening.
- Pull the latch up and towards the hood.
- Lift the latching mechanism out of its housing.
- Rest the latching mechanism towards the cab.
- Perform the above for both hood latches.
- Place one hand on the hood emblem, and keeping one foot on the ground, place a foot on the bumper.
- Carefully, tilt hood forward.
NOTE: A hood could hurt someone in the way of its descent. Before lowering the hood, be sure there are no people or objects in the way.
Closing the Hood
- The hood hold-open device will only be engaged if the vehicle hood is fully open. Once it is fully open, the latch will automatically engage and will need to be disengaged by the operator. The release lever for the hood hold-open device is located near the front hinge of the hood.
- Pull the lever out to disengage the hood hold-open device.
- When closing the hood, be sure that you maintain the same point of contact (top of hood) to control the movement of the hood as it closes.
- Gently lower the hood into place to avoid damage to the hood or cab.
NOTE: Do not let go of the hood while it closes. Close the hood in a controlled manner which requires hand firmly grasping the hood and feet on a stable, non-slip surface. Failure to control the hood as it closes may result in death or personal injury.
NOTE: Always ensure the hood hold open latch is engaged to keep the hood fully open any time anyone gets under the hood for any reason. Failure to do so may cause the hood to close uncontrollably which may result in death or personal injury.
NOTE: Before closing the hood, be sure the area is clear – no people or objects are in the way. Failure to do so may result in death or personal injury.
Safety Restraint Belts
NOTE: Hard braking or a collision locks the belt. The belt will also lock when driving up or down a steep hill or in a sharp curve.
NOTE: Unbelted riders could be thrown into the windshield or other parts of the cab or could be thrown out of the cab. They could strike another perons. Injuries can be much worse when riders are unbelted. Always observe user warnings pertaining to safety belts.
NOTE: Do not drive vehicle without your seat belt and your passengers’ belt fastened. Riding without a safety belt properly fastened can lead to injury or death in an emergency.
NOTE: Do not use the swivel function while a passenger is in the seat and the vehicle is in motion. The seat belt will not provide proper protection if the passenger is not facing forward and the vehicle is in an accident. Failure to comply may result in death or personal injury.
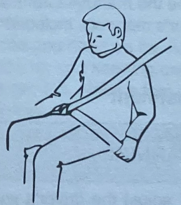
- Correct placement of Lap Belt.
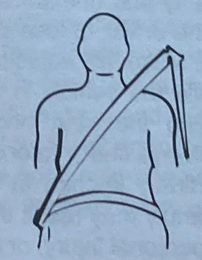
- Correct placement of Shoulder Belt.
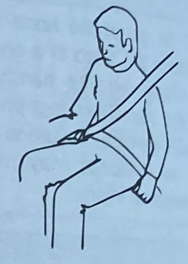
- Incorrect placement of Lap Belt (belt too high on the hip).
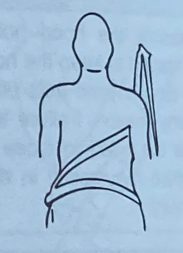
- Incorrect placement of Shoulder Belt.
- Pregnant women should always wear combination lap/shoulder belts. The lap belt portion must be worn snugly and as low as possible across the pelvis. To avoid pressure on the abdomen, the belt must never pass over the waist. A properly worn seat belt may significantly reduce the risks to woman and baby in the event of a crash.
- To fasten the belt:
- Grasp the belt tongue.
- Pull belt in a continuous slow motion across your chet and lap.
- Insert belt tongue into buckle on inboard side of seat.
- Push down until the tongue is securely locked with an audible click.
- Pull belt to check for proper fastening and adjustment.
- Pull shoulder section to make sure belt fits snugly across chest and pelvis.
- There should be less than one inch (25mm) gap between the body and the belt.
- The should belt must be positioned over the should, it must never rest against the neck or be worn under the arm.
- Make sure any slack is wound up on the retractor and that the belt is not twisted.
- If the belt is locked, lean the body back to remove any tension in the belt.
- After releasing the belt, allow the belt to retract completely by guiding the belt tongue until the belt comes to a stop.
- To unfasten the belt:
- Push the release button on the buckle and the belt should spring out of the buckle. The seat belt indicator will turn off once the driver’s seat belt is fastened.
- Ensure tether belt is attached to the cab floor and seat frame. It should be routed through the buckle on each side. Often the attachments are made using a split-type hook. Make sure both halves of the hook are around the anchor bracket.
NOTE: Do not remove, modify, or replace the tether belt system with a different system. A failed or missing tether belt could allow the seat base to fully extend in the event of an accident. Failure to comply may result in death or personal injury.
NOTE: Failure to adjust external tether belts properly can cause excessive movement of the seat in an accident. Tether belts should be adjusted so that they are taut when the seat is in its most upward and forward position. Failure to comply may result in death or personal injury. - Adjust an external tether by either lengthening or shortening the strap.
- To lengthen the strap:
- Turn the buckle to a right angel to the webbing.
- Then pull the buckle.
- To shorten the tether:
- Pull on the strap.
- To eliminate cinching, simply activate the Komfort Latch device located on the seat belt webbing at the appropriate time.
- Adjust the seat to its proper driving position.
- Latch the seat belt.
- If available, adjust the seat belt height adjuster to a comfortable driving position.
- While seated appropriately, push the “on” button to engage the Komfort Latch.
- Lean forward in the seat until you hear a “click”.
- Return to normal driving position, and the Komfort Latch maintains the preset amount of tension relief.
- To disengage the mechanism, unbuckle the seat belt and then press the “off” button of the Komfort Latch or tug on the shoulder strap.
Starting Vehicle
- Set the parking brake.
- Put main transmission in neutral.
- Disengage (depress) the clutch (with manual transmission).
- Turn the ignition switch to start.
- If the engine does not start within 30 seconds, release the ignition switch. To avoid overtaxing the starter motor or the batteries, don’t sue the starter for more than 30 seconds.
- Let the starter motor cool and the batteries recover for two minutes before trying again.
- If the engine still won’t start after a couple of tries, check the fuel lines for possible fuel starvation or air leaks. Starting failure may mean fuel is not reaching the injectors.
- As soon as the engine starts, begin to watch the oil pressure gauge.
- If the oil pressure doesn’t rise within a few seconds, stop the engine. Find out what is wrong before restarting the engine.
- Slowing engage (release) the clutch after the engine has started.
- Wait for the oil pressure gauge to reach normal operating pressure before operating the vehicle or idling faster than 1,000rpm.
Engine Warm Up
- Engine warm-up allows oil film to be established between pistons and liners, shafts and bearings while your engine gradually reaches operating temperature.
- After starting the engine, idle at approximately 600rpm while checking:
- Oil pressure
- Air pressure
- Alternator output
- After a few minutes of idling at 600rpm, increase your idle speed to 900 or 1,000rpm.
NOTE: Do not allow engine to idle at low rpm (400-600rpm), longer than five (5) minutes. Long periods of idling after the engine has reached operating temperatures can decrease engine temperature and cause gummed piston rings, clogged injectors and possible engine damage from lack of lubrication. The normal torsional vibrations generated can also cause transmission wear. - Continue the warm-up until the coolant temperature reaches at least 130°F (54°C). At this temperature, use partial throttle.
- Wait until the coolant temperature is at least 160°F (71°C) before operating at full throttle.
Warming Up Transmission
- Put the transmission in Neutral.
- Release the clutch pedal (manual only) and operate the transmission in neutral for 3 to 5 minutes prior to operating the transmission in either forward or reverse range.
- If a two-transmission combination:
- Put the main transmission in gear.
- Put the auxiliary transmission in neutral. This will allow the transmission countershaft to turn, agitating the oil and warming it.
Starting the PTO
- Toggle PTO On/OFF switch to the ON position. Text indicating PTO engagement will appear at the center of the display. Vehicles with PACCAR or an EATON automated transmission will display the letters AN in the transmission gear indicator.
- Press the Cruise Control (CC) On/Off button to enable PTO speed control operations. A white speed control enabled icon will appear.
- Press the SET + and RES – Cruise Control (CC) buttons to command a desired engine speed. PTO Speed Control is now active.
- To increase or decrease PTO engine speed use a combination of short and long presses of the SET + and RES – Cruise Control (CC) buttons.
- PTO speed indicates on the digital tachometer and below it, as a numerical readout.
NOTE: Increase engine rpm before the PTO is actually engaged could prevent the PTO from engaging and/or cause PTO damage.
Stopping the PTO
- There are many ways to disable PTO Speed Control depending on how the vehicle is configured.
- Tap the service brake.
- Engage the clutch.
- Turn Cruise Control Off
- Release the Parking Brake – (this is applicable only if PTO was activated while the truck was stationary).
- Toggling the PTO switch to Off.
- Stopping the PTO will return the engine speed to its default setting.
NOTE: It is not advised to stop the PTO when engine speed is above the default setting. Remember to quit PTO operations fully, toggle the PTO switch to Off.
Operating Manual Transmissions
- For vehicles with a clutch pedal, locate the clutch pedal and engage the clutch brake.
- Shift into a low gear.
NOTE: Always use first gear or a low speed range to start the vehicle in motion. The use of a higher gear or speed range forces undue strain on the engine, clutch and other transmission components, and may cause damage. - Evaluate the road surface conditions and terrain your vehicle is on. Select a gear low enough to let your vehicle start forward with the throttle at idle.
- Push the parking brake valve handle (yellow) against the dash panel to release the brakes.
- Release the clutch pedal (manual only), then gradually accelerate to permit smooth starting.
- Do not allow your vehicle to roll (even a little) in the opposite direction during clutch engagement. if you need to start up on an incline, apply your service brakes before you release the parking brake. Then release your service brakes as you engage the clutch and apply throttle.
Operating Hydraulic Clutch
- Depress the clutch pedal past the first 1/2 inch (13mm) for approximately 5 1/2 inch (139.7mm) of total pedal travel.
- Depress the clutch pedal another 1/2 inch (13mm) to engage the clutch brake.
Shift Using Double Clutch Method
- Push the clutch pedal down to disengage the clutch.
- Move the gear shifter lever to neutral.
- Release the pedal to engage the clutch. This lets you control the rpm of the transmission mainshaft gears, allowing you to match the rpm of the mainshaft gears to those of the output shaft.
Engaging the Parking Brake
- Come to a complete stop.
- Press down completely on the service brake pedal.
- Pull up on the parking brake lever until it reaches an over (top) center position.
NOTE: The parking brake indicator on the dash will come on prior to brake being fully applied. - Release the service brake pedal. Ensure the lever is over center.
Releasing the Parking Brake
- Press down completely on the service brake pedal.
- Press the parking brake release at lever to the the floor.
NOTE: The parking brake indicator on the dash will turn off prior to brake being fully disengaged. - Release the service brake pedal.
Parking Brake Burnishing
- Drive the vehicle at 15mph (24 km/h) in a low gear (first or second) on a dry, hard road surface.
- Apply the parking brake lever with a moderate force (approximately 40 pounds) until the vehicle is brought to a stop. Do not allow the wheels to lock up.
- After stopping, release the parking brake lever and drive the vehicle at 20mph (32 km/h) in a low gear for approximately 2.5 miles, to allow the brake drum to cool.
- Repeat above steps until a total of 10 stops have been completed.
- Adjust the parking brake lever.
Before Leaving the Cab
- Apply all parking brakes. Pull out the Yellow Parking Brake Control knob located on the dash. The Red (octagon-shaped) Trailer Air Brake Supply Control Knob will automatically pop out. (A dash warning light will indicate when the brake is On).
- Shift the transmission into park position:
- Manual transmission, select First or Reverse gear.
- Automatic transmission, select Neutral.
- Turn the key to Off.
- Remove the key.
Release Vehicle Parking Brakes Only
- Push in the yellow knob on the dash. Your trailer will remain parked.
- Below 60psi the yellow parking brake valve remains Out (On position). If air pressure is not restored above 60psi the knob will automatically return to the Out position if you attempt to push it in.
- Check the Primary and Secondary Air Pressures in the Primary Gauges gauge view.
Release Trailer Brakes Only
- Push in the Red knob on the dash. The vehicle will remain parked.
Release Full Combination of Brakes
- Push in both knobs on the dash.
- In the event that air pressure is reduced below a safe level:
- The low air warning light will come on first
- If air pressure continues to drop, the parking brake valve will pop out, automatically apply the spring brakes.
Vehicle/Trailer Air Supply Valve
- To supply air to the trailer system and release the trailer parking brakes, allow the vehicle air system pressure to build up to operating level.
- When system pressure reached 50psi the Red knob may be pushed in.
- Hold the red knob in by hand until the trailer air pressure builds to a pre-set level, about 45psi. At this point it will remain in, charging the trailer system and releasing only the trailer brakes.
- The yellow knob will remain out (vehicle brakes on).
Normal Run Position
- The yellow knob (system park) may now be pushed in, which will supply air to the vehicle spring brakes, releasing them.
Brake Warning Lamp
- If the buzzer sounds while driving, or if the brake light comes on, slow down carefully.
- Downshift – putting the transmission into a lower gear will help slow the vehicle.
- Pump the brakes – pumping the brake pedal may generate enough hydraulic pressure to stop the vehicle.
- Use the parking brake – the parking or emergency brake is separate from the hydraulic system. Therefore it can be used to slow the vehicle.
- Move a safe distance off the road and stop.
- Set the parking brake.
- Turn on the emergency flasher and use other warning devices to alert other motorists.
To Lock the Inter-Axel Differential
- Anticipate when you might need increased traction, slow down to a steady speed under 25mph or stop the vehicle.
NOTE: Do not lock the differential while going down steep grades or traveling faster than 25mph, or while wheels are spilling or traction is minimal; lock the differential before you encounter these conditions. - Put the inter-axel differential lock switch in the lock position. A light on the switch will turn on, indicating that the differential is locked (engaged).
- If you lock or unlock the differential while moving, let up momentarily on the accelerator pedal to relieve torque on the gearing and allow full engagement of the clutch (mechanism that locks the wheels).
- Drive the vehicle through the poor traction area, keeping your speed under 25mph.
To Unlock the Inter-Axel Differential
- When you reach dry pavement or better road conditions where the differential lock is not needed, switch the differential lock to unlock.
- Let up momentarily on the accelerator pedal to relieve torque and allow the clutch to disengage.
- When you unlock the differential, normal vehicle handling will resume and the light on the switch will turn off.
Operate Two-Speed Axle – Low to High
- Be sure the differential is unlocked.
- Maintain your vehicle speed (accelerator depressed) and move the Range Selector lever to High.
- Keep driving with the accelerator depressed until you want the axle to shift.
- To make the axle shift, release the accelerator until the axle shifts. You are not in the high axle range for highway speeds. Shift the transmission normally to reach your desired cruising speed.
Operate Two-Speed Axle – High to Low
- Maintain vehicle speed (accelerator depressed) and move the Range Selector lever to Low.
- Keep driving with the accelerator depressed until you want the axle to downshift.
- To make the axle downshift, release and depress the accelerator quickly to increase the engine rpm. The axle will shift to Low range.
- You are now in the low axle range for rough terrain and heavy loads. Shift the transmission normally to maintain the desired speed.
Pusher or Tag Suspension Calibration
NOTE: Perform this procedure at or near a weight scale. Procedure can be performed while parked on the weight scale if scale is available.
- Park the loaded vehicle on a level surface with the wheels blocked.
- Release vehicles spring brakes. (Do not release for Liftable/Non-Steerable pusher or tag axles)
- Lower the pusher/tag axles with the Axle Lift Control flip valve. (For some non-liftable axles, inflate air suspension)
- Adjust the amount of load on each axle by turning the Pressure Regulator clockwise to increase the load, or counterclockwise to decrease the load. (The suspension manufacturer may publish pre-established Pressure-to-Load Ratio Pressure Settings to assist you in achieving an estimated ground load).
- After setting the pressure to obtain the desired axle load, verify proper ground loading with the weight scale.
How to Lock the Kingpin
- Ensure trailer brakes are locked and the landing gear is down.
- Back the tractor fifth wheel into the trailer kingpin to engage and lock.
- Pull the tractor forward to ensure the kingpin has been locked in place.
- Set the tractor parking brake.
- Connect the tractor brake air and electric lines to the trailer.
How to Release the Kingpin Remotely (option)
- Set both the vehicle and trailer parking brakes.
- Lower the landing gear.
- Disconnect the tractor brake air and electric lines from the trailer.
- Flip up cover, then press and hold the Kingpin Release switch for 3 seconds. A countdown timer popup will appear on the display, and the unlock symbol on the Kingpin Release switch will illuminate. The popup will inform the operator when to release the switch.
NOTE: The fifth wheel will not unlock unless the vehicle is stopped and the parking brake is set. In this situation, a red-colored popup appears, informing the operator that kingpin release is not available and to set the parking brake. This will require restarting this procedure. - Release the switch. The unlock symbol on the Kingpin Release switch will turn off.
- Ease tractor forward enough for the kingpin to clear the fifth wheel (about 12 to 18 inches).
- If the tractor has a rear air suspension, deflate (dump) the rear suspension enough so that the fifth wheel will smoothly separate from the trailer.
- Ease tractor forward, clearing the trailer.
- If the rear suspension was deflated, return rear suspension to its normal height.
How to Release the Kingpin Manually
- Position the tractor and trailer in a straight line on firm, level ground.
- Set both the tractor and trailer parking brakes.
- Exit cab and lower the trailer landing gear.
- Disconnect brake air and electric lines from trailer, and secure lines.
- Unlock the fifth wheel release handle if necessary, then unlock the fifth wheel.
NOTE: Operating the release handle and unlocking the fifth wheel will depend on the fifth wheel manufacturer. - Return to cab and release tractor parking brake.
- Ease tractor forward enough for the kingpin to clear the fifth wheel (about 12 to 18 inches).
NOTE: Do not drive tractor free of trailer. - If the tractor has a rear air suspension, deflate (dump) the rear suspension enough so that the fifth wheel will smoothly separate from the trailer.
- Ease tractor forward, clearing the trailer.
- If the rear suspension was deflated, return rear suspension to its normal height.
How to Slide the Fifth Wheel
NOTE: This procedure assumes a connected trailer. The trailer kingpin must be locked within the fifth wheel when changing slide positions.
- Position the tractor and trailer in a straight line on firm, level ground.
- Place the tractor in neutral, and set the tractor and trailer parking brakes.
- Unlock the slide by repositioning the Fifth Wheel Slide Switch.
NOTE: Ensure the tractor and trailer brakes are engaged prior to sliding the fifth wheel. Failure to engage the brakes could result in uncontrolled sliding of the fifth wheel and possibly damage components on the tractor or trailer. - Inspect and verify that locking plungers have fully withdrawn from the fifth wheel slide tracks.
- If locking plungers did not fully withdraw, move tractor slightly to reposition plungers and reinspect.
- If plungers are still not fully withdrawn, lower the landing gear and deflate the rear suspension (if available) to lessen pressure on the slide.
- Release the tractor parking brake, but keep the trailer brakes engaged.
- Slowly ease the tractor forward or backward, and stop at the desired position.
- Lock the slide by returning the Fifth Wheel Slide switch to its previous position.
- Inspect and verify that the locking plungers are fully inserted into the fifth wheel slide tracks.
- If the locking plungers are not fully inserted in the track, move the tractor slightly to reposition plungers and reinspect.
- If the landing gear was lowered, raise the landing gear.
- If the rear suspension was deflated, return rear suspension to its normal height.
Final Stopping
- Set the parking brake before leaving the driver’s seat. To hold your vehicle while it is parked do not rely on air brakes, hand control valve for trailer brakes, or engine compression.
- If you are parked on a steep grade, block the wheels.
- Drain water from the air reservoirs. While the engine and air supply system are still warm, drain moisture from the air reservoirs. Open the reservoir drains just enough to drain the moisture. Don’t deplete the entire air supply. Be sure to close the drains before leaving the vehicle.
E. Maintenance
- Drain moisture from the supply and service air tanks.
- Operate air devices to circulate lubricant within the unit.
- Check the coolant level daily. Inspect the vehicle’s coolant surge tank for proper coolant level. Add coolant if the level in the tank is below the line marked Min.
- To add coolant to the cooling system, turn off the engine and let it cool for a minimum of 10 minutes.
- If your cooling system is built with an air bleed valve in the upper engine coolant pipe, open the air bleed valve before filling the surge tank.
- Close any open coolant drain valves in the lower engine coolant pipe.
- Remove the surge tank fill cap, but do not remove the surge tank pressure cap.
- Fill the system with premixed coolant through the surge tank fill port. Pour coolant at a stead rate until it reaches the lower of the two lines indicated by either Cold Min or Min on the surge tank. Wait for one minute after adding coolant. If the coolant level drops, add coolant until it returns to the lower line.
- Close the air bleed valve if opened.
- Start the engine and maintain an idle at a low rpm.
- While the engine is idling air will purge from the cooling system via the surge tank’s coolant fill port, which will lower the coolant level in the surge tank. Continue to fill the surge tank until the coolant level remains approximately 1/2 in. above the Min line. This may take up to 2 minutes, depending on the outside temperature.
- Maintain a low idle until the thermostat opens and the operating temperature stabilizes. A sign that the thermostat has opened is when the upper coolant pipe gets hot on the bottom side indicating hot coolant is now running through it.
- Add coolant to the surge tank until the coolant remains 1/2 inch. above the Cold Min or Min level.
- Operate the engine at high idle for 10 minutes. Afterward, add coolant to the surge tank until the coolant remains 1/2 in. above the Cold Full line.
- Reinstall the surge tank fill cap.
- Check the washer reservoir water level daily, located in the engine compartment. If necessary, refill to the proper level.
- Park the vehicle and apply the parking brakes.
- Open the hood and secure it in the open position.
- Locate the washer fluid reservoir located on the driver’s side of the engine compartment, behind the wheel, and open the filler cap.
- Fill the 2.1 Gallon reservoir with windshield washer fluid and replace the cap.
NOTE: Do not use antifreeze or engine coolant in the windshield washer reservoir, damage to seals and other components will result. - Close and secure the hood.
- Check engine oil level. Top up with oil, if necessary, via the filler opening. Use the correct grade in the correct quantity. Wait 1 minute after topping up and check the oil level again. Reinstall the oil fill cap and twist to lock it in place.