
I. Purpose & Scope
To safely and effectively provide instruction on the inspection and proper use of semi-con scoring tools.
II. Definitions
Standard PPE – High Viz Garment, Hard Hat, Z-87.1 Safety Glasses, Gloves, Pants, Work Boots
III. Process
NOTE: Work instruction does not supplement the manual. For specific instructions for the exact model please refer to the owner’s manual.
A. Potential Hazards
- Sharp Object Hazard
B. PPE
- Standard PPE
C. Inspection
- Check for damage.
- Insure blade is sharp.
D. Use
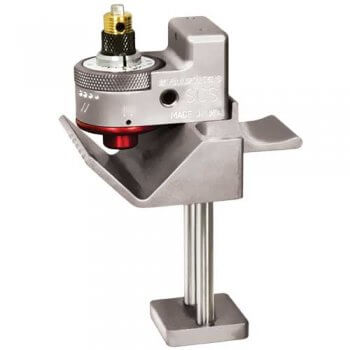
Blade Depth Setting
- Set the blade to a depth equal to 75-90% the thickness of the semi-con screen. Rotate the black blade depth adjustment knob clockwise until the slot in the split collar aligns with the desired blade depth.
- If semi-con thickness is not known, the blade depth should be checked for acceptability on a sample piece of the cable being prepared.
- If a sample is not available, the cable end can be used as a test section.
Ring Cut
- Observe the blade position mark on the blade position knob. Rotate the knob fully to the left.
- Lower the jaw to open the tool and secure the tool on the cable at the termination point of the semi-con.
- Rotate the tool 1 full turn counter clockwise around the circumference of the cable for ring cut.
Spiral Cut
- Turn the blade positioning knob to one of the spiral cut locations.
- Adjust the tool pitch to the cable size. The tool pitch is most aggressive at the smallest setting.
- Turn the tool counter clockwise and allow it to advance toward the end of the cable, and completely off the cable.
NOTE: If preferred, the tool may be operated from the end of the cable and advanced inward. Reverse operating instructions, advancing the tool with clockwise rotation.
Longitudinal Score Cut
- After finishing the ring cut, proceed to the longitudinal cut by rotating the blade position knob to the longitudinal tracking position.
- Carefully pull the tool down the full length of the cable scoring it to the cable end.
- Position the tool back on the cable at the ring cut and create the desired amount of score cuts down the length of the semi-con.
Semi-Con Removal
- With long nose pliers or other appropriate tool, remove the semi-con in one continuous chip (spiral), or as individual chips (longitudinal scores).
E. Maintenance
- Keep the tool clean and dry.
- Occasionally apply a few drops of 3-in-1 or WD-40 oil under blade position know in back corner to maintain smooth blade indexing.
Blade Replacement
- Turn the black blade adjusting knob counter clockwise until it stops. The dial should read 0.
- Loosen the blade retaining screw with a 1/16″ hex wrench and remove blade form the collar.
- Insert a section of cable into the tool with the base of the scoring head resting on the cable OD.
- Insert a new blade assembly through the collar with the flat of the shaft facing the screw. Drop the blade so it is resting on the cable OD.
- Retighten the blade holding screw against the flat portion of the blade shaft.
- Re-adjust the blade to the desired depth setting.
Blade Alignment
- If misalignment is determined, turn the blade alignment adjusting screw with a 1/8″ hex wrench in the correct direction to bring the tool back to a properly tracking ring cut.