
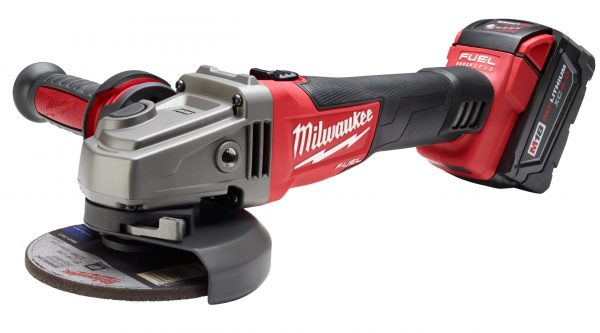

I. Purpose & Scope
To safely and effectively provide instruction on the inspection and proper use of angle grinders.
II. Definitions
Standard PPE – High Viz Garment, Hard Hat, Z-87.1 Safety Glasses, Gloves, Pants, Work Boots
III. Process
NOTE: Work instruction does not supplement the manual. For specific instructions for the exact model please refer to the owner’s manual.
A. Potential Hazards
- Flame/Fire hazard
- Electric shock hazard
- Kickback hazard
- Flying Debris Hazard
B. PPE
- Standard PPE
- Hearing Protection
- Face Shield
- Respiratory protection – Recommended
C. Inspection
- Check for misalignment or binding of moving parts, breakage of parts and any other condition that may affect the power tool’s operation.
- Check to ensure cutting tools are sharp and clean.
- Inspect handles and grasping surfaces to ensure they are dry, clean and free of oil and grease.
- Inspect accessories such as abrasive wheels for chips and cracks, backing pad for cracks, tear or excess wear, wire brush for loose or cracked wires.
NOTE: If power tool or accessory is dropped, inspect for damage or install an undamaged accessory. - Check for issues such as undue noise.
D. Use
Paddle Switch Operation
- To start the tool, grasp the handle and the side handle firmly and slide the switch to “ON”.
- Push the lock-off button forward and squeeze the paddle switch.
- To stop the tool, release the paddle switch. Make sure the tool comes to a complete stop before laying down the tool.
Slid Switch Operation
- To start the tool, grasp the handle and side handle firmly and slide the switch to “ON”.
- To stop the tool, release the switch. Make sure the tool comes to a complete stop before laying down the tool.
- To lock-on the switch, slide the switch to “ON” and press down on the front of the switch.
- To stop the tool, press and release the switch. Make sure the tool comes to a complete stop before laying down the tool.
General Operation
- If you have just installed an accessory or are beginning a period of work, test the wheel by letting it spin for one minute before applying it to the work-piece.
WARNING: Never use an accessory that has been dropped. Out-of-balance or damaged accessories can mark workpiece, damage the tool, and cause stress that may cause accessory failure. - Use a clamp, vise or other practical means to hold the workpiece, freeing both hands to control the tool.
WARNING: Hold tool securely with both hands. - Start the tool.
NOTE: If the battery is inserted when the tool is “ON”, the tool will not run. Turn the tool “OFF”, then back “ON” to begin work. - Allow accessory to come to full speed before beginning work.
- Control pressure and surface contact between accessory and workpiece.
WARNING: Never bang accessory onto work. Too much pressure causes accessory failure or slows speed. - When finished, turn off the tool and make sure it comes to a complete stop before laying it down.
Using Grinding Wheels
- When grinding, hold tool at a 5 to 15 degree angle, using constant pressure for a uniform finish. Too great of an angle causes concentrated pressure on small areas which may gouge or burn work surface.
Using Cut-Off Wheels
- Cut-off wheels are suited for small cut-off and shallow notching operations only.
- Using the face of a cut-off wheel (as in grinding) will cause the wheel to crack and break, resulting in serious personal injury.
Using Wire Brushes
- Wire brushes are useful for removing rust, scale, burrs, weld slag, etc.
WARNING: Everyone in the area must wear protective clothing an safety goggles or face shields. Fatigued wires and residue will fly off the brush with considerable force, causing potential for serious injury. - Never exceed Maximum Safe Operating Speed of brush. Do not use a damaged brush or one that is functioning improperly ( throwing wires, out-of-balance, etc.). These conditions increase the possibility of further brush failure and possible injury. Discard and replace damaged brushes immediately.
- Always install wire brushes according to the accessory manufacturer’s instructions.
- Only use accessories with threads matching the tool spindle.
- Test wheel for balance and loose or damaged wires by letting it spin for one minute before applying it to the workplace. During this time, no one should stand in front of or in line with it.
- Control pressure and surface contact between wheel and workpiece. Too much pressure causes over-bending of wires and heat build-up causing premature wire breaking, rapid dulling and reduced brush life. Instead of more pressure, try a wire wheel with more aggressive cutting action (increased wire size, decreased wire length or different brush type (knot type vs. crimped wire type).
Using Sanding Discs
- Hold tool at 5 to 15 degree angle to ensure proper sanding pressure and control. Too great an angle will result in too much pressure and could cause excessive wear to the disc and workpiece. Too small an angle will reduce control.
- Use long, sweeping, side to side strokes, advancing forward to produce the desired finish.
E. Maintenance
- Clean power tool air vents.
- Remove battery pack or unplug after use. Store battery pack away form other metal objects, like paper clips, coins, keys, nails, screws or other small metal objects, that can make a connection from one terminal to another.
- Clean dust screen by tapping it against a hard surface, or blow clean with compressed air.
- Keep handles clean, dry and free of oil or grease.
- Use only mild soap and a damp cloth to clean, since certain cleaning agents and solvents are harmful to plastics and other insulated parts.
(Performed by Authorized Personnel Only)
Manufacturer: Milwaukee
Model: M18
| Potential Energy Hazards | Method of Neutralizing Energy | Permits Required |
|---|---|---|
 Electric Electric Air Air | LOTO Disconnect lines | Safe work |
| Pneumatic Gravity | Block/bleed Release pressure | Hot work |
| Mechanical Gas | Set fire watch Confined space permit | Line blanking |
| Hydraulic Water | Confined space |
Lockout (Shut-Down Procedure)
- Notify all affected personnel.
- Turn off unit.
- Remove battery pack.
- Tagout the battery pack.
Start-up Procedure
- Notify all affected personnel that equipment is operational and removal of tagout will occur.
- Remove all tools, equipment and debris from the area.
- Remove tagout from the battery pack.
- Reconnect the battery pack to the tool and test equipment.